TODO
- The ray dashboard, worker and head must only be available from inside your kubeflow user namespace
- Reenable the istio sidecar for the ray head and worker in the user namespace and provide the corresponding Istio Authorizationpolicies. We can keep the istio sidecar for the deployment kuberay-operator in the namespace kubeflow, since it does NOT use a webhook, but something else to reconcile rayclusters. This means we also do not need a networkpolicy for the ray operator.
> Credit: This manifest refers a lot to the engineering blog ["Building a Machine Learning Platform with Kubeflow and Ray on Google Kubernetes Engine"](https://cloud.google.com/blog/products/ai-machine-learning/build-a-ml-platform-with-kubeflow-and-ray-on-gke) from Google Cloud.
# Ray
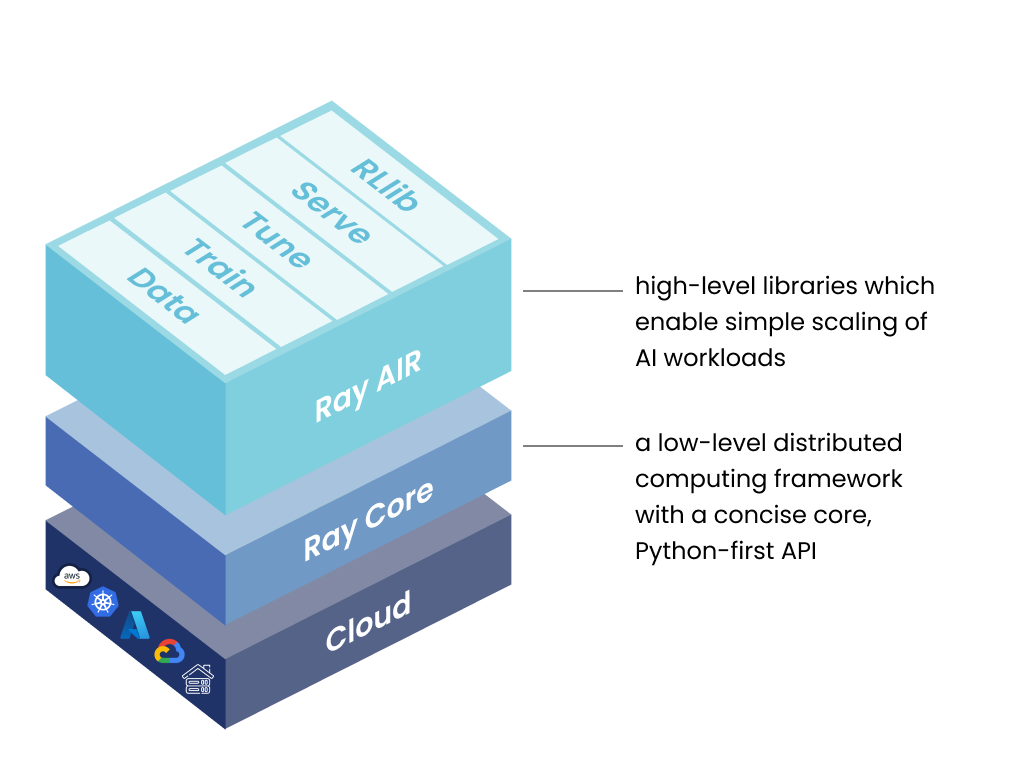
[Ray](https://github.com/ray-project/ray) is a unified framework for scaling AI and Python applications. Ray consists of a core distributed runtime and a toolkit of libraries (Ray AIR) for simplifying ML compute.
Stack of Ray libraries - unified toolkit for ML workloads. (ref: https://docs.ray.io/en/latest/ray-overview/index.html)
# KubeRay
[KubeRay](https://github.com/ray-project/kuberay) is an open-source Kubernetes operator for Ray. It provides several CRDs to simplify managing Ray clusters on Kubernetes. We will integrate Kubeflow and KubeRay in this document.
# Requirements
* Dependencies
* `kustomize`: v5.2.1+ (Kubeflow manifest is sensitive to `kustomize` version.)
* `Kubernetes`: v1.29+
* Computing resources:
* 16GB RAM
* 8 CPUs
# Example
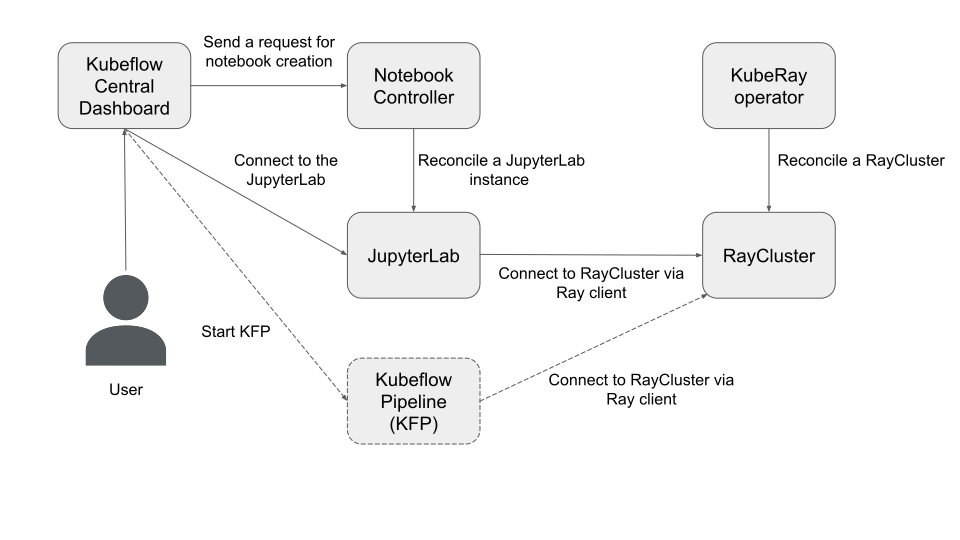
Note: (1) Kubeflow Central Dashboard will be renamed to workbench in the future. (2) Kubeflow Pipeline (KFP) is an important component of Kubeflow, but it is not included in this example.
## Step 1: Install Kubeflow v1.7-branch
* This example installs Kubeflow with the [v1.9-branch](https://github.com/kubeflow/manifests/tree/v1.9-branch).
* Install all Kubeflow official components and all common services using [one command](https://github.com/kubeflow/manifests/tree/v1.7-branch#install-with-a-single-command).
* If you do not want to install all components, you can comment out **KNative**, **Katib**, **Tensorboards Controller**, **Tensorboard Web App**, **Training Operator**, and **KServe** from [example/kustomization.yaml](https://github.com/kubeflow/manifests/blob/v1.7-branch/example/kustomization.yaml).
## Step 2: Install KubeRay operator
We never ever break Kubernetes standards and do not use the "default" namespace, but a proper one, in our case "kubeflow" for the ray operator.
```sh
# Install a KubeRay operator and custom resource definitions.
kustomize build kuberay-operator/overlays/kubeflow | kubectl apply --server-side -f -
# Check KubeRay operator
kubectl get pod -l app.kubernetes.io/component=kuberay-operator -n kubeflow
# NAME READY STATUS RESTARTS AGE
# kuberay-operator-5b8cd69758-rkpvh 1/1 Running 0 6m23s
```
## Step 3: Install RayCluster
```sh
# Create a RayCluster CR, and the KubeRay operator will reconcile a Ray cluster
# with 1 head Pod and 1 worker Pod.
# $MY_KUBEFLOW_USER_NAMESPACE is a proper Kubeflow user namespace with istio sidecar injection and never ever the wrong "default"
export MY_KUBEFLOW_USER_NAMESPACE=development
kubectl apply -f raycluster_example.yaml -n $MY_KUBEFLOW_USER_NAMESPACE
# Check RayCluster
kubectl get pod -l ray.io/cluster=kubeflow-raycluster -n $MY_KUBEFLOW_USER_NAMESPACE
# NAME READY STATUS RESTARTS AGE
# kubeflow-raycluster-head-p6dpk 1/1 Running 0 70s
# kubeflow-raycluster-worker-small-group-l7j6c 1/1 Running 0 70s
```
* `raycluster_example.yaml` uses `rayproject/ray:2.23.0-py311-cpu` as its OCI image. Ray is very sensitive to the Python versions and Ray versions between the server (RayCluster) and client (JupyterLab) sides. This image uses:
* Python 3.11
* Ray 2.23.0
## Step 4: Forward the port of Istio's Ingress-Gateway
* Follow the [instructions](https://github.com/kubeflow/manifests/tree/v1.7-branch#port-forward) to forward the port of Istio's Ingress-Gateway and log in to Kubeflow Central Dashboard.
## Step 5: Create a JupyterLab via Kubeflow Central Dashboard
* Click "Notebooks" icon in the left panel.
* Click "New Notebook"
* Select `kubeflownotebookswg/jupyter-scipy:v1.9.0` as OCI image (or any other with the same python version)
* Click "Launch"
* Click "CONNECT" to connect into the JupyterLab instance.
## Step 6: Use Ray client in the JupyterLab to connect to the RayCluster
* As I mentioned in Step 3, Ray is very sensitive to the Python versions and Ray versions between the server (RayCluster) and client (JupyterLab) sides.
```sh
# Check Python version. The version's MAJOR and MINOR should match with RayCluster (i.e. Python 3.11.9)
python --version
# Python 3.11.9
pip install -U ray[default]==2.23.0
```
* Connect to RayCluster via Ray client.
```python
# Open a new .ipynb page.
import ray
# For other namespaces use ray://${RAYCLUSTER_HEAD_SVC}.${NAMESPACE}.svc.cluster.local:${RAY_CLIENT_PORT}
# But we use of course our per namespace ray cluster to have multi-tenancy and
# We never ever use "default" as namespace since this would violate Kubernetes standards
ray.init(address="ray://kubeflow-raycluster-head-svc:10001")
print(ray.cluster_resources())
# {'node:10.244.0.41': 1.0, 'memory': 3000000000.0, 'node:10.244.0.40': 1.0, 'object_store_memory': 805386239.0, 'CPU': 2.0}
# Try Ray task
@ray.remote
def f(x):
return x * x
futures = [f.remote(i) for i in range(4)]
print(ray.get(futures)) # [0, 1, 4, 9]
# Try Ray actor
@ray.remote
class Counter(object):
def __init__(self):
self.n = 0
def increment(self):
self.n += 1
def read(self):
return self.n
counters = [Counter.remote() for i in range(4)]
[c.increment.remote() for c in counters]
futures = [c.read.remote() for c in counters]
print(ray.get(futures)) # [1, 1, 1, 1]
```
# Upgrading
See [UPGRADE.md](UPGRADE.md) for more details.